90% of Homes Lost to Wildfire Were Ignited by Embers, Not Flames.
Burning debris travels miles ahead of the fire front. It lands in your gutters, your vents, under your deck. A single ember can smolder for hours, then ignite your home long after the fire has passed.
How Embers Destroy Homes
Travel Up to 1 Mile Ahead
Wind carries burning debris far ahead of the fire front, landing on homes that seem safely distant.
5 Entry Points on Every Home
Vents, gutters, eaves, decks, and windows. Each one is a spot where a single ember can start a fire.
Smolder for Hours Unnoticed
An ember in your attic or gutter can burn slowly, then ignite your home long after the main fire passes.
Home hardening + automated sprinklers seal every gap and wet every surface where embers land.
Why Embers Are the Real Threat
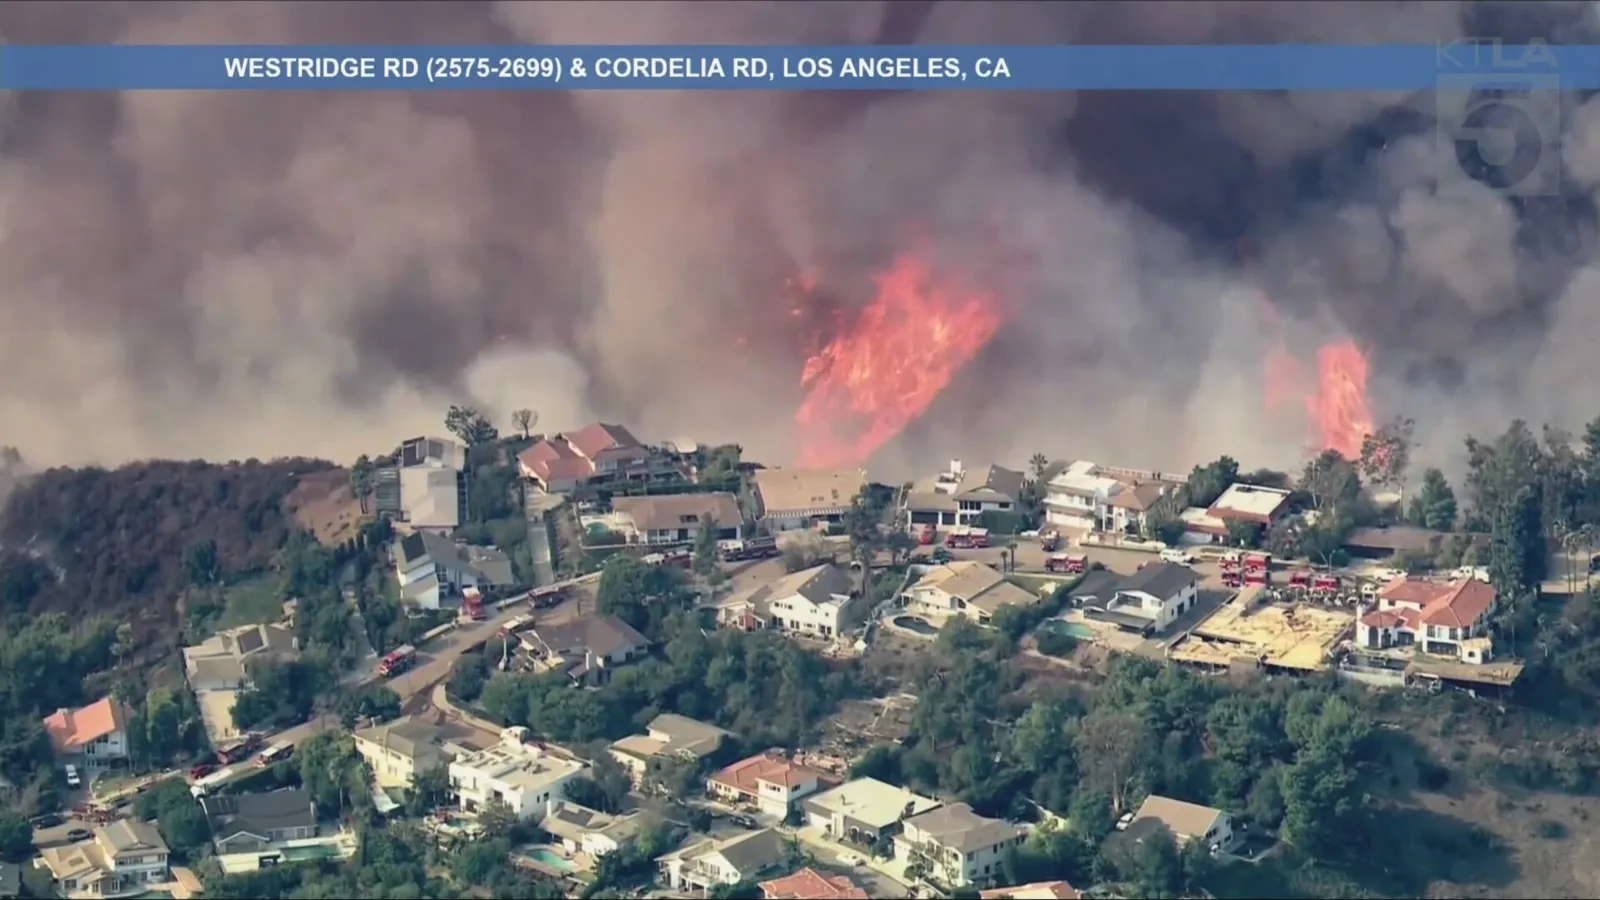
Most people picture a wall of flame consuming a house. The reality is different and, in many ways, more dangerous.
Research by the Insurance Institute for Business and Home Safety (IBHS) has shown that embers and small flames, not direct fire contact, are responsible for up to 90% of home ignitions during wildfires. That number surprises a lot of people.
During the 2007 Witch Creek Fire in San Diego County, roughly two-thirds of the 1,100 homes destroyed were ignited by wind-driven embers, not by the fire front itself. Homes more than a quarter mile from the nearest burning vegetation were still lost because embers crossed that distance easily.
This is actually good news from a protection standpoint. If most homes ignite from embers rather than direct flame, then most home losses are preventable. It means the specific, targeted work of sealing vulnerabilities and maintaining your property matters far more than hoping the fire goes around you.
Ember Facts
- Embers can travel more than a mile ahead of the fire front in strong wind
- A single ember can smolder in an attic for hours before producing visible flames
- Wind-driven embers during the 2018 Camp Fire traveled across the Sacramento River
- Homes with defensible space and hardened exteriors survive ember storms at dramatically higher rates
- Most ember ignitions happen in the first 0 to 5 feet around a structure (Zone 0)
Where Your Home Is Most Vulnerable
Embers exploit specific weak points on a home. Knowing where they are is half the battle. Here are the areas we see most often during property assessments.
Gable vents and roof openings are primary entry points for embers. Unscreened vents allow firebrands directly into attic spaces. Source: NIST Wildland-Urban Interface Fire Research
Vents and Soffits
Critical RiskAttic vents, soffit vents, and foundation vents are the most common entry points. An ember that gets through a vent can smolder inside your attic for hours before igniting. California Building Code Chapter 7A now requires ember-resistant vents with mesh no larger than 1/8 inch. Many older homes still have 1/4-inch mesh or no screening at all.
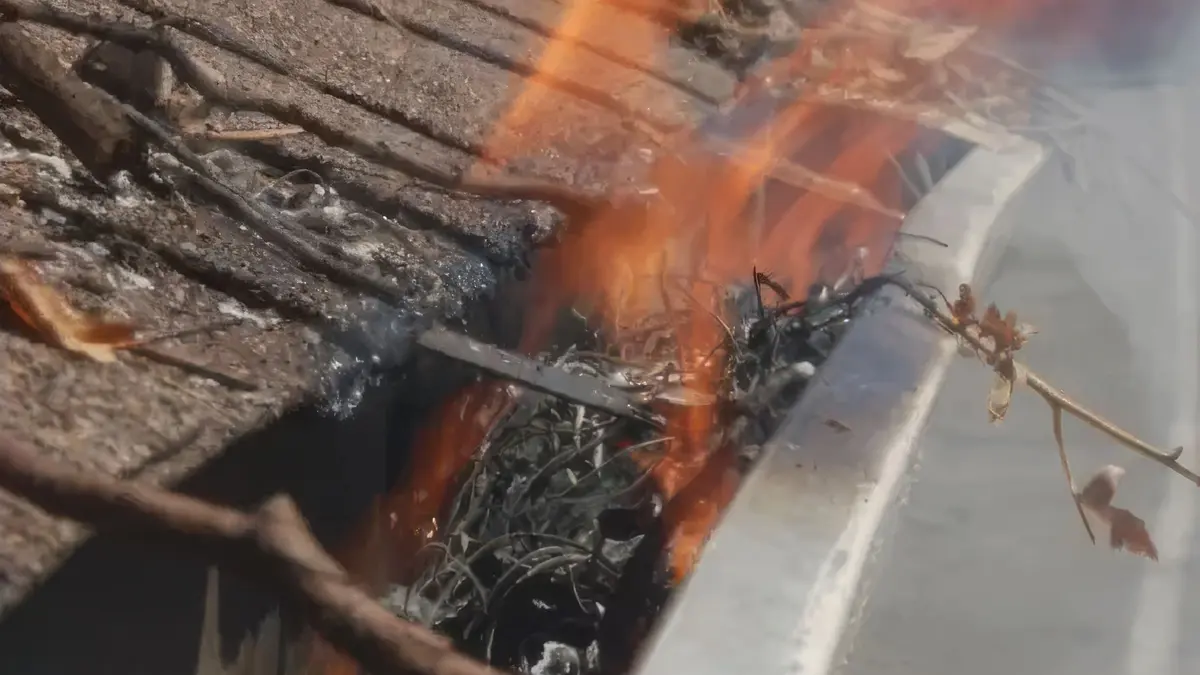
Gutters and Roof Valleys
High RiskGutters filled with dry leaves, pine needles, and debris are essentially kindling traps. When an ember lands in a clogged gutter, it has everything it needs: fuel, oxygen, and direct contact with your roof edge or fascia board. Metal gutters with guards help, but regular cleaning is still the most reliable defense.
Decks and Fencing
High RiskWood decks, especially those with gaps between boards, collect dry debris underneath that embers can ignite. Fencing attached directly to your home acts like a wick, carrying flames right to your exterior wall. Zone 0 regulations now require non-combustible fencing within five feet of the structure.
Windows and Skylights
Moderate RiskSingle-pane windows can crack or shatter from radiant heat, letting embers inside. Tempered or dual-pane windows perform significantly better. Skylights, particularly older plastic models, are also vulnerable to direct ember contact and heat exposure.
Eaves and Overhangs
High RiskOpen eaves expose the underside of your roof deck to embers. Boxed-in (enclosed) eaves with fiber cement or stucco soffits are far more resistant. Many California homes built before 2008 have open eave construction that does not meet current Chapter 7A standards.
California Building Code Chapter 7A
California is the only state with mandatory ember-protection building standards for homes in wildland-urban interface zones. Here is what Chapter 7A requires.
Roofing
- Class A fire-rated roofing materials required
- Non-combustible gutters or approved gutter covers
- No gaps in roof covering that could trap embers
Exterior Walls
- Non-combustible or ignition-resistant exterior cladding
- Minimum 6 inches of non-combustible material from ground level
- Weather-resistant barriers under cladding
Vents
- Ember-resistant vent products required in all openings
- Maximum 1/8-inch mesh screen (1/16-inch recommended)
- Vents must resist flame penetration and ember intrusion
Windows and Doors
- Tempered glass required on exterior windows
- Exterior doors must be non-combustible or solid core
- Garage doors rated for wind-driven ember exposure
Decking
- Ignition-resistant materials required for decking surfaces
- Deck underside protection from ember intrusion
- Non-combustible material at deck-to-wall connections
Eaves and Soffits
- Enclosed eave construction required
- Non-combustible or ignition-resistant soffit materials
- All gaps and joints must be sealed against ember entry
Chapter 7A applies to new construction and substantial remodels in State Responsibility Areas (SRA) and Local Responsibility Areas (LRA) designated as Very High Fire Hazard Severity Zones. Many Bay Area communities fall within these zones. Browse the Home Hardening Products Guide to see which vents, siding, decking, and roofing products are listed by the California State Fire Marshal. Our home hardening documentation process evaluates your property against these specific requirements.
How to Protect Your Home from Embers
No single measure stops embers on its own. It takes a combination of home hardening, defensible space, and active defense working together. Here are the specific actions that make the biggest difference.
Screen all vents with ember-resistant mesh
Replace vent screens with 1/16-inch to 1/8-inch corrosion-resistant metal mesh. This includes attic vents, foundation vents, soffit vents, and any other opening into your home. The cost is typically $15 to $50 per vent.
Clean gutters and remove roof debris regularly
At minimum, clean gutters twice a year. In fire season, check monthly. Remove all leaf litter, pine needles, and debris from your roof, valleys, and around skylights. Consider metal gutter guards as a long-term solution.
Create a non-combustible Zone 0
Within five feet of your home, remove all combustible materials. Use gravel, concrete, or stone instead of wood mulch. Replace wooden fencing sections attached to your home with metal or masonry. This five-foot buffer is one of the single most effective things you can do.
Upgrade windows in high-exposure areas
Replace single-pane windows with tempered glass or multi-pane windows, especially on sides of your home facing slopes or vegetation. Tempered glass is four to five times stronger than standard glass under heat stress.
Enclose open eaves and soffits
If your home has open eave construction, box them in with non-combustible materials like fiber cement board or stucco. This eliminates one of the most common ember entry pathways and is often required for Chapter 7A compliance.
Add exterior sprinkler protection
Roof and perimeter sprinkler systems wet down your home and the immediate surroundings before and during a fire. They are most effective when paired with home hardening. A soaked roof is significantly harder for embers to ignite than a dry one.
How Exterior Sprinklers Help with Ember Defense
Exterior sprinkler systems are one layer in a multi-layered defense. They are not a substitute for home hardening and defensible space, but they add a meaningful advantage when conditions are most dangerous.
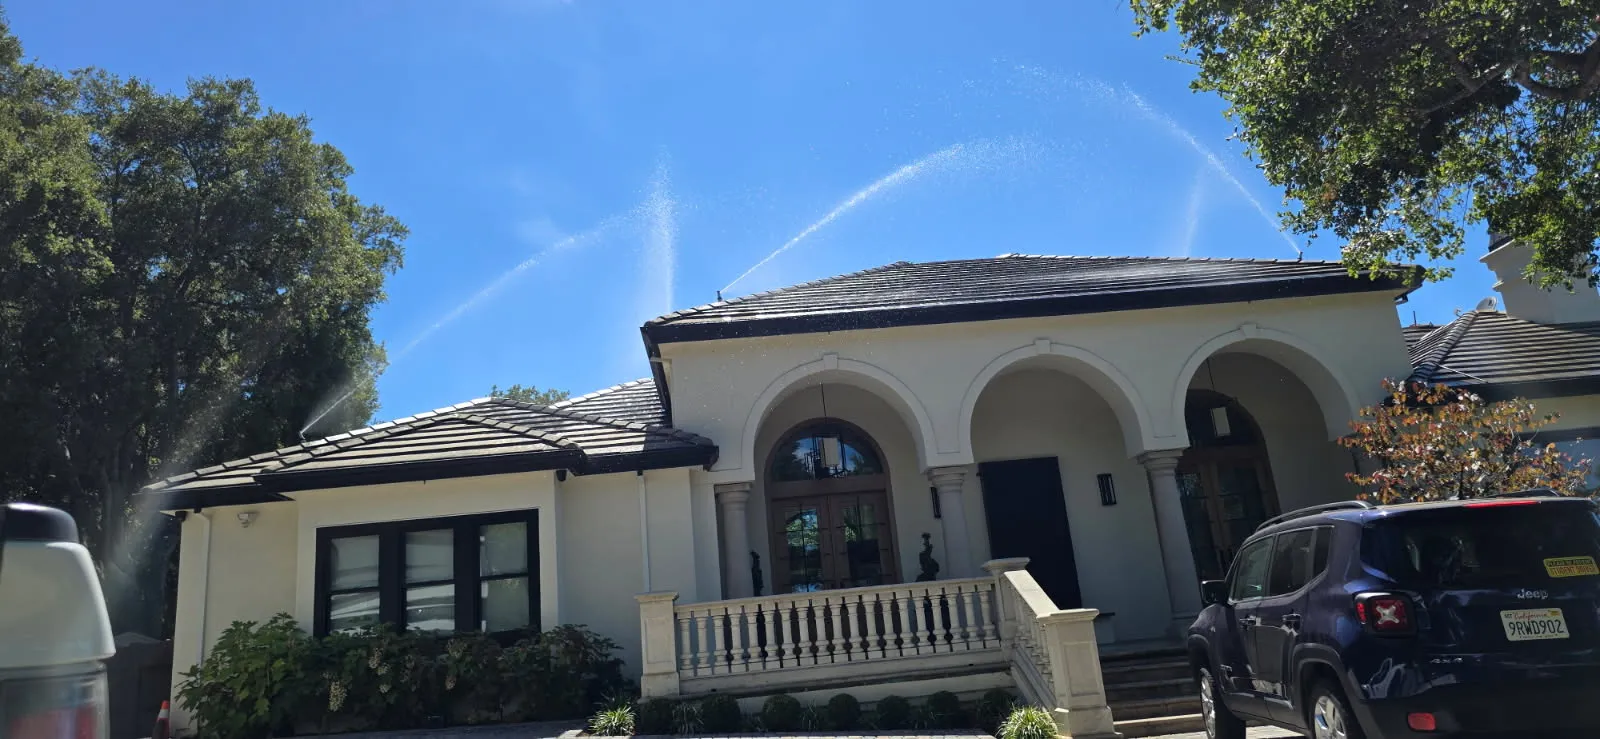
When embers land on a wet surface, they are far less likely to ignite. A soaked roof, wet siding, and damp vegetation around your home all reduce the chance that incoming embers find something to burn. That is the basic principle behind exterior sprinkler systems.
Roof sprinklers saturate your roofing material and cascade water down walls and over eaves. Perimeter sprinklers wet the ground, shrubs, and fencing within the immediate area around your home. Together, they reduce surface temperatures and flush embers off before they can accumulate.
But we always tell clients the same thing: sprinklers work best when your home is already hardened. Sprinklers cannot cover every gap in a vent screen or seal an open eave. They are one part of the equation. The most effective ember defense combines home hardening documentation and exterior sprinkler systems with proper defensible space maintenance.
Our approach: We start with home hardening documentation to identify every vulnerability on your property, then design a sprinkler system tailored to your specific risk profile. Every property is different, and cookie-cutter solutions leave gaps.
Ember Protection and Insurance
Insurance companies are paying close attention to how well homes are protected from embers. Proper documentation of your ember mitigation work can directly influence your coverage and premiums.
Safer from Wildfires Framework
California's Regulation 2644.9, known as "Safer from Wildfires," established 12 categories of wildfire mitigation that insurers must consider when evaluating risk. Several of those categories relate directly to ember protection: vent screening, roofing materials, eave construction, and exterior cladding.
When your home meets standards across these categories, you have documented evidence to present to your insurer. This can help with FAIR Plan discounts, exiting the FAIR Plan entirely, or qualifying for standard-market coverage.
What We Document
- Current condition of all vent openings, mesh sizes, and compliance status
- Roofing material fire rating and gutter condition
- Eave construction type, including whether eaves are enclosed or open
- Window glazing type and exterior door ratings
- Decking material and deck-to-wall connection details
- Defensible space conditions across all zones
- Upgrades completed, how they meet code, and photographic evidence of compliance
We document current conditions, show what upgrades have been made, and explain how they comply with building code. Our goal is to help clients build the strongest possible case for insurance documentation under the Safer from Wildfires framework. Learn more about wildfire insurance in California.
About the FireRoofs Team
We are wildfire mitigation specialists based in the San Francisco Bay Area. Our founders come from extensive backgrounds in construction and landscaping, and we live and work in high fire risk areas ourselves. We deal with ember protection every day, from assessing vent screens on hillside homes in Woodside to designing sprinkler systems for properties in Saratoga and Los Gatos, CA.
Our work covers home hardening, exterior sprinkler systems, and the documentation that ties it all together. Home hardening can include roofing, vent replacement, siding, fencing, and defensible space work. Our installation crews are licensed general contractors. That means we stay current on ember-protection research, building code changes, and insurance requirements that directly affect our clients.
Every recommendation on this page comes from what we see in the field. We have assessed hundreds of homes across the Bay Area and the patterns are consistent: the homes that survive ember storms are the ones where owners took the time to address every vulnerability, from the smallest vent screen to the widest stretch of defensible space.
We serve 48 communities across the Bay Area, from the Santa Cruz Mountains to the East Bay Hills. Find your city to see the specific wildfire risks and service options for your neighborhood.
Related Resources
Continue learning about wildfire protection for California homes.
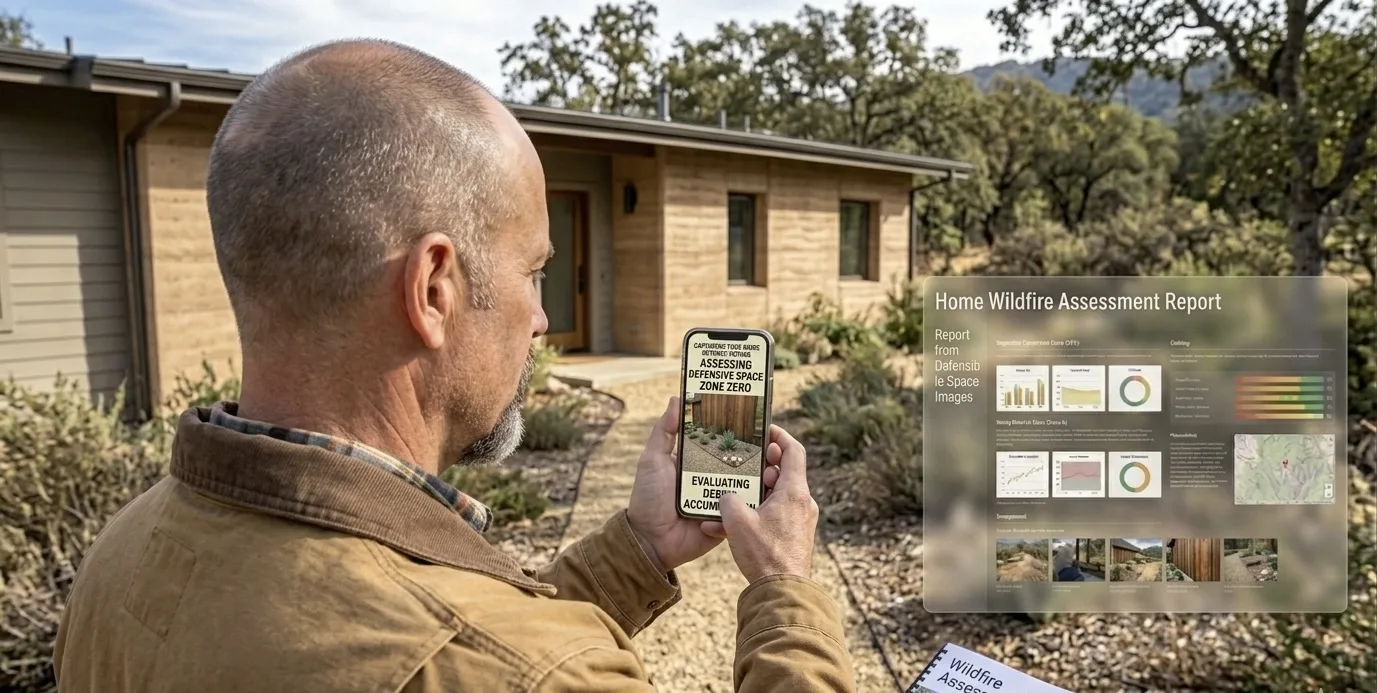
Find Out Where Your Home Is Vulnerable
Our wildfire assessment identifies every ember vulnerability on your property. You get a detailed report with specific recommendations, code compliance status, and documentation you can use with your insurance company.
Is Your Roof Ready for Ember Exposure?
Embers travel miles ahead of the fire front. Our satellite pre-assessment shows your roof material, vegetation proximity, and fire zone so you can see exactly where ember intrusion risk is highest.
- Roof condition and material visibility from satellite
- Nearby vegetation that could generate ember showers
- Full assessment with ember protection recommendations available
Takes about a minute. No account needed.